Procedural Materials
For illustrated, step-by-step learning, start with the MaterialZ tutorials. They cover materials, meshes, published controls, footprints and connector-based assembly. This page remains the detailed material workflow reference.
Eldiron includes the MaterialZ (MZ) row editor for procedural textures. A material is an editable recipe, its project-palette bindings and its baked render data. Use the same sources for 2D map tiles, 3D floors and walls, and screen artwork. Ordinary bitmap and animated tiles remain supported.
Make a procedural tile
- Open the Tile Picker and select a tile or a vacant board cell.
- Click Make Proc to create a procedural material for that selection.
- The Procedural Materials sidebar tab opens automatically when a procedural tile is selected. The map remains available for editing.
- Drag a source from Sources into an outlined empty slot. Dropping into the first slot of the empty row creates another row.
- Select an operation to edit its controls in Props. Numeric controls support both sliding and manual entry. Use the source category menu and search field to find noise, shapes, operators, colors and image sources.
Recipes, palette bindings and changes to their settings are saved in the project and participate in Undo/Redo. The resulting tile can be painted with the Rect tool or assigned with Apply Tile.
Rows and outputs
Operations run left to right within a row, and rows run top to bottom. Place a producer above a row that consumes it. A noise row can feed a later mixer; you do not need another copy of the noise in each consuming row.
The Row Input tab controls how the selected row receives upstream values. Props edits the selected operation or material constants; Tile contains source/tile settings; Sources is the draggable operation library.
The PBR outputs are Color, Roughness, Metallic, Opacity and Emission, in that order. Each can connect to a row, or use its constant when disconnected. Height and Normal are not exposed as material outputs in this Eldiron workflow.
Connections belong to rows. Removing an operation does not disconnect the row's existing consumers. Selected-row connections are highlighted; the others remain dimly visible. Click a connection to reveal its origin row and select its first operation. Click a connected input terminal to disconnect it.
Choose authored colors through the project palette, including Color tiles, ramps and emission colors. See Palette Tool for switching palettes without replacing recipe references.
Create and reuse mesh recipes
In Procedural Materials → Meshes, choose New mesh or New… → Browse recipes…. Search the library or filter building parts, nature, props and primitives. The browser includes box, wall segment, wall corner, roof slope, repeated posts, rock, tree, barrel and crate recipes. Project lists your own recipes for creating independent copies. Preview a recipe, adjust its published dimensions and palette colors, enter a name and choose Create mesh.
Every result remains an editable MZ recipe. Select its Group to adjust published controls, or open the Group to change the construction rows. Selecting a mesh in the Tilepicker keeps the map ready for placement; Edit mesh opens the full editor. In 2D Iso, the same recipe produces the tile preview and map rendering; recipe edits refresh those outputs through the existing MZ pipeline.
To make your own controls, select a Group and choose Asset… → Publish controls…. Add or reorder controls, set their labels, sections, help, values, neutral/default values and ranges, then choose a behavior. Width, height and depth change one dimension independently. Scale, offset and palette controls can apply to the whole group or a named part. The live preview shows the result. Save controls applies one undoable source edit; Cancel discards the draft. Publishing from inside a Group edits its interface. At the document root, with no Group selected, saving wraps the construction in an editable Group.
Custom weighted or rig-aware mappings remain intact. Asset… → Advanced
controls (TOML)… supports editing these mappings and multiple part targets.
Choose Recipe parameter to drive construction inputs before the mesh is
built. Click Recipe input to search the named construction fields, then set
Multiply by and Then add:
input = published value × multiplier + offset. The Binding menu adds or
selects additional inputs for the same control. For a grounded wall height,
bind the source Box height with multiplier 1 and its Transform Y position with
multiplier 0.5. Remove binding removes only the selected input mapping.
Box dimensions, contour coordinates, extrusion thickness, transform values, loft rings/segments, surface offset and roughness/metallic are supported numeric inputs. Nested groups expose their published controls; groups without controls can expose their construction inputs. Targets use operation identities, so renaming a row does not disconnect a binding. Missing inputs, conflicting bindings and invalid resulting geometry prevent saving and display an error.
A control's optional Formula calculates its value from other controls in the
same Group. Insert control reference… searches by label and inserts a stable
[control-id] reference; simple IDs such as count can also be typed directly.
Choose Input / calculated value for an input or readout without a direct mesh
binding. Formula controls can also use Recipe parameter to drive construction.
They appear as calculated, read-only values when using the recipe. Edit the formula
in Publish controls, or clear it to make the value editable again.
Expressions support +, -, *, /, parentheses, sin_deg, cos_deg, tan_deg,
sqrt, abs, min, max, clamp, floor, ceil and round. Dependencies can
refer forwards or chain through other calculated controls. Unknown references,
cycles, division by zero and results outside the declared range prevent saving.
References stay local to their Group; containing groups can bind its editable
published inputs. Calculations run before construction, including in iso previews,
map tiles, exported recipes and runtime geometry. Source formulas remain editable.
The Gable roof browser recipe calculates half_run = span / 2,
length = half_run / cos_deg(slope) and rise = half_run * tan_deg(slope).
Its nested panel recipes calculate the mitered ridge cut from pitch and thickness,
so both faces meet while changing pitch. The Fence recipe calculates
length = count * spacing and uses it for two continuous rails; Repeat creates
only the posts. Both parts are used in the iso published-controls playground.
For static MZ parts in 2D Iso, Follow recipe shape in the compact placement sidebar uses the recipe's footprint for collision and walkable support. It applies to selected independent placements and subsequent painting. Edits, rotation, dragging, undo and save/reopen preserve the placement anchor. Existing recipes without a footprint keep the mesh-bounds fallback. Disable the setting to freeze a footprint for manual map editing; shared map vertices/edges remain untouched.
To author a shape entirely in MZ:
- Add a Contour row before the final mesh row. Its two coordinates are X/Z for a footprint. Use the normal contour editor to draw a simple closed polygon of 3–64 vertices, including concave shapes.
- Add Footprint from Sources → Geometry after the final mesh or Assemble operation, and choose that row with Contour (X/Z). This annotates the mesh without adding visible geometry.
- In Publish controls, bind the same controls to mesh construction and contour coordinates. The bundled Wall corner does this for width, depth and thickness. Tree binds Trunk width/depth to both its loft and eight-sided footprint, allowing the player to walk beneath its canopy while the trunk stays solid.
Footprints can contain several solid regions, each with its own holes. On a Footprint node, choose the outer contour with Contour (X/Z), then use Add hole to select enclosed cutouts. Each hole selector can change or remove that cutout. Enable Add region on another Footprint node to append a separate solid region; leave it off to replace the incoming footprint. For example:
{"type":"footprint","row":"outer","holes":["opening"],"append":true}
Repeat copies a seed mesh's complete footprint, preserving the gaps between posts. Assemble combines the footprints of its input rows. Regions form a union; holes subtract from their own region. Islands inside holes can be another region. Hole contours must be strictly inside their outer contour and cannot touch, overlap or contain other holes in that region. Up to 128 regions, 256 rings and 4096 points are supported, with 3–64 points per ring. Animated footprints are not supported. Whole-group controls and transforms move all rings together; bind contour coordinates explicitly for individual-part deformation.
The browser includes Doorway (separate jamb footprints beneath a lintel), Repeated posts (copied footprints) and Ring walkway (a top-anchored raised surface with an empty center). Their published controls update geometry and footprints together. The iso playground places examples from these same recipes. For the ring, Top height sets its walkable surface elevation; thickness extends below that plane. Movement, grid navigation and walkable support preserve holes and gaps. Invalid recipes retain the last good artwork and collision. Save/load, undo, rotation, dragging and copy/paste retain the compound layout and anchor.
The Repeat operation is available in MZ Sources → Geometry. Place it after a static mesh and material assignment. Count creates 1–128 real copies; spacing and rotation specify the step per copy. Copies retain source materials and UVs, and existing copies keep their identities when count changes. The vertex budget still applies. The Repeated posts browser recipe exposes count and spacing; wall parts expose actual thickness, and Roof slope exposes the panel slope in degrees. These are ordinary MZ operations and bindings, with no asset actions.
Existing scaling controls retain their behavior. Opening a Group edits its authored construction defaults; parameter bindings override those defaults on an evaluation copy. Edit the published control to change the resulting asset. Recipes, bindings and repeat settings survive save/load, export and undo/redo; 2D Iso and 3D use the same evaluator.
Minimap preview
The material preview occupies the minimap, below the sidebar. Its icon buttons choose a PBR channel and either the material output or the selected operation/source. Selecting an entry in Sources can preview it before adding it. The preview fills the pane so tile boundaries and repeating patterns are visible. Hover an icon for its meaning.
The Continuous, Repeat and Seamless buttons also change the saved material tiling setting. They are not merely preview display modes: changes propagate to placements on the map.
| Mode | Use |
|---|---|
| Continuous | Sample across the surface's coordinates, producing variation across neighboring tiles or a large floor/wall. |
| Repeat | Wrap one authored pattern period. Placements share the repeating tile rather than storing another copy for each placement. |
| Seamless | Blend shifted pattern copies near the period's boundaries to join repeating edges. |
Continuous coordinates on a top-down surface follow world X/Z. Other surfaces use their surface projection, so a wall's axes need not match a floor's. Use consistent scale and orientation on adjoining surfaces when their patterns must join.
Material swatches and the material editor stay flat in 2D Iso: a material is independent of camera projection. Map tiles and mesh outputs keep their iso previews. Continuous MZ ground outputs retain their source's coordinate-addressed pages, so the pattern varies across the world instead of repeating one diamond. Moving or extending their placements updates the required bake coverage.
Unit MZ terrain parts with a complete horizontal top at local Y=0 and standard ground UVs can use the same continuous material on their walkable tops. Their side sprites remain part of the mesh bake; custom UV layouts are preserved. Continuous texturing does not smooth the part's geometry: stacked blocks still have stepped heights.
Smooth hills use the shared terrain surface instead. A terrain control vertex sets height and influence radius; the same terrain rules serve the map cameras. In 2D Iso, ground materials and composition masks follow that surface using world X/Z coordinates. A winding Auto road can therefore continue up and down a hill without separate sloped tile recipes or repeated material resets. Walk height, editor picking and the rendered iso triangles agree. MZ stairs and building parts keep their authored geometry and heights.
To shape a hill directly, use the Terrain brush's Raise, Lower and Smooth modes. Radius and strength control its circular falloff, and one stroke is one undo step. Sculpting changes the shared height surface while leaving MZ recipes and painted path masks intact.
For precise control points, select a ground MZ material, add or select a vertex, and open Edit Vertex. Enable Terrain control, set Y and Influence radius, then apply. The first control enables terrain for the map. Paint and compose ground with the Rect tool at edit height zero; the cursor follows the terrain. Use an explicit raised edit height for construction floors.
The current renderer bakes textures and surface pages. Continuous variation does not mean evaluating a material graph for every pixel at game runtime. Large continuous surfaces can require more bake coverage and loading work than Repeat.
Terrain materials from geometry TOML
Use the Linedef tool for paths and the Sector tool for filled areas.
Select the geometry and open Edit Linedef or Edit Sector. Its TOML has
an independent [terrain.material] section. The selected geometry supplies the
shape automatically; there is no binding step in Rect Compose.
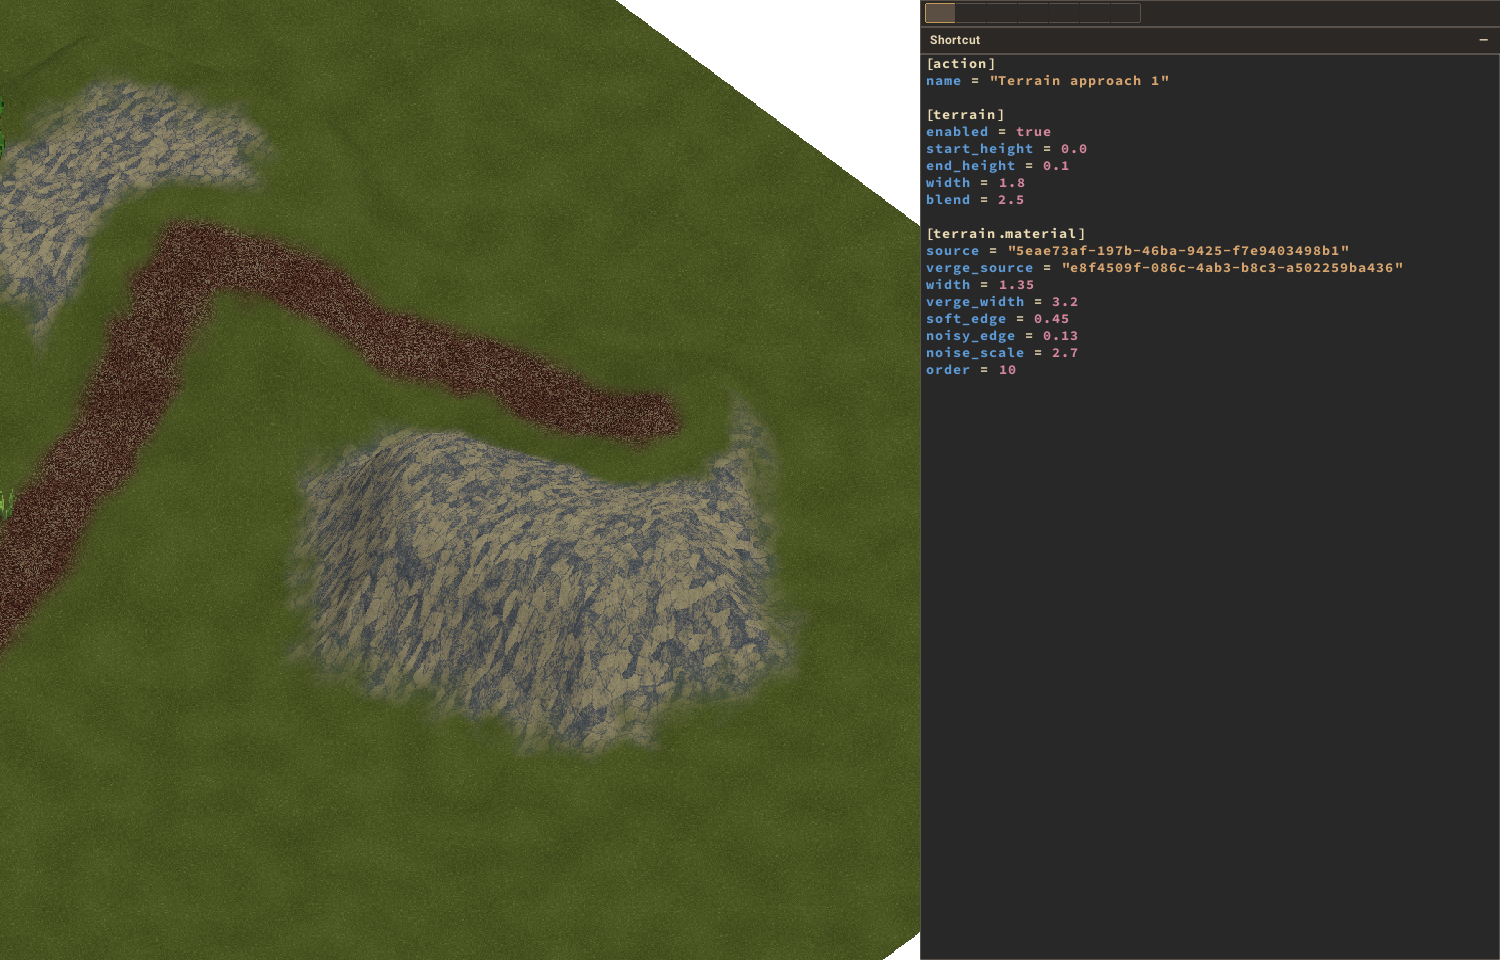
source accepts a material/tile UUID or an exact Tile Picker alias. Use
Copy Tile ID in the picker, then paste the UUID into source. Alternatively,
select the action's Terrain material HUD slot and choose a tile in the picker;
the slot fills the same TOML setting. Linedefs have a second Path verge material
slot. Apply the settings normally. Clear source (and verge_source for a path)
to remove the coverage without deleting the geometry or its height settings.
For a path, for example:
[terrain.material]
source = "Inn / earth"
width = 1.35
soft_edge = 0.45
noisy_edge = 0.13
noise_scale = 2.7
order = 10
verge_source = "Inn / grass"
verge_width = 3.2
For a rocky sector:
[terrain.material]
source = "Terrain / Weathered hill rock"
inset = 0.5
soft_edge = 1.0
noisy_edge = 0.28
noise_scale = 2.7
order = 0
- Width is the full path width; connected segments with matching settings form one continuous path, including rounded joins and ends.
- Inset pulls the area material inside its sector boundary. Zero uses the whole sector. Separate sectors can share the same material and edge settings.
- Soft edge is the transition width; Noisy edge is the boundary's uneven displacement. Both are measured in map units. Noise scale controls detail.
- Order controls overlaps: larger values blend later. At equal order, paths blend over areas. A path's optional verge blends first, then its main material. A grass verge wider than a dirt trail gives it grassy shoulders beside rock.
The painted ground is always the background. Existing base tiles and their
painted blends remain editable. MZ materials supply all surface channels,
including roughness, so sun and local lights remain dynamic. Moving the guides
moves material coverage; sculpting changes its height while preserving its
world coordinates and pixel density. [terrain] height settings are independent:
a path can paint flat ground without raising it.
The shared system works in 2D, 2D Iso and 3D. Eldiron derives MZ outputs and world pages from these settings and refreshes them after edits. Those outputs are caches, hidden from the Tile Picker; edit the source material or geometry settings. Save/reopen and normal map undo/redo preserve the authored settings. The maintained UnendingNight project uses this workflow for its rocky hills and winding, grass-edged dirt trail.
The Materials / Meshes tabs navigate the MZ recipe workspace. Materials edits surface recipes; Meshes creates procedural 3D parts such as walls, roofs and trees. Compose hides these workspace tabs and shows its blend controls. Opening a source material recipe restores the workspace tabs; Back to composite returns to the blend controls.
Compose directly on the map
Material authoring edits a reusable source; composition edits how sources cover a particular placement or surface. Rect Compose uses tile shapes. Linedef and sector geometry are edited separately through their own settings.
- Paint a base tile, for example grass, with the Rect tool.
- Switch the Rect tool from Paint to Compose, then click the painted tile in the map. In 3D, target the painted surface cell.
- The existing surface is automatically the starting result. Pick a road or another material in the Tilepicker and click Use selected material. Picking alone changes neither the blend nor the open editor. Bitmap tiles work as inputs too; no background or material dropdown is needed.
- Click a shape thumbnail directly in the panel: halves, diagonals, curved corners, edge strips, horizontal/vertical roads, crossings, Auto road, or Blend.
- Adjust the selected shape. Soft edge blends its boundary; Wobble adds an uneven edge. Width, position and angle depend on the shape.
Each blend combines its material with the current result below it. Use Add blend with a Tilepicker material selected to add markings, dirt, borders or decoration. The blend buttons select an existing layer for editing; Use selected material replaces that layer's material. Remove deletes it. Reordering with Earlier / Later, source editing and specialist mixing options are under Advanced mixing. Whole floor, ceiling and wall-surface compositions remain available where those surface targets are selected.
Under Advanced mixing, use Save copy to Tilepicker to turn the current composition into a reusable tile. Paint that copy elsewhere instead of rebuilding the same road composition. Auto road derives its connections from adjacent compatible placements; the other shape presets retain their authored orientation.
These controls also work in 2D Iso. Shapes are evaluated on the ground's X/Z plane, then projected into the isometric view. Curved corners, soft edges, uneven edges and Auto road use the same controls and world-coordinate pages as the other cameras. Picking an isometric MZ output as an input uses its underlying material recipe, so editing that source updates the composition. While a map composition is open, picking another tile keeps the composition open.
Images and animation
Drag Image / Tile Source from the Image category into a row to use an imported image or an existing project tile. Select it and choose the source in Props. Linked tiles preserve their alpha and animation/material data and refresh when their bitmap changes. Use repeating image edges for textures or transparent edges for stamps. Connect its color and alpha to Color and Opacity, or combine it with other layers using Alpha Over. Imported bitmap colors are not automatically converted into palette-index recipe controls.
Animated recipes can use Loop Flow for moving ripples or flowing patterns. Animation is baked into frames and played by the tile animation system; editing an animation does not introduce a live material VM. Check both preview and game playback, since tile animation is paced through the project's animation tick.
Resolution, transparency and gameplay
Game → Settings → Procedural Materials → Pixels per tile controls world material baking globally. The default is 16; 0 uses smooth evaluation with 64-pixel storage. See Game Configuration for this setting, tile backgrounds and independent character/item pixelization. Item icon recipes use their own 32×32 output, separate from world tile density.
A material's appearance does not assign gameplay semantics. Set Role, Blocking and Gameplay Tags through tile metadata where needed: water or rock can block movement, while a painted road need not. Equipment rules and item state changes likewise remain gameplay data, not material nodes.
Paint materials and organic stamps
The Paint tool shares the Tile Picker with Rect. Activate Paint to add its existing procedural materials, brush patterns and organic stamps as editable MZ recipes. Choose artwork in Paint materials, Paint brushes or Organic stamps, then apply it with the toolbar above the map. Selecting a recipe keeps the map open; Edit recipe opens its MZ editor.
The Paint Source and Stamp Source operations retain the native procedural generators and expose their palette and variation settings. The generated images are embedded, replaceable caches. Existing strokes and stamps retain a reference to the recipe, so editing it updates their artwork without changing their terrain anchors. The MZ graph remains available for additional material processing.
See the Paint Tool guide for placement controls, terrain sculpting behavior and a source-editing walkthrough.